
BALANCE
Inspiration:
Whilst taking pictures of Chester’s industrial path I come across a signet swimming amidst discarded rubbish in Chester canals, close to the old and unused locks that in the past connected to the River Dee.

The beauty of the signet, the ripples of the water and reflection of the skies compete in great contrast with mans discarded and decaying belongings. Along with the concrete of the canals and surrounding urban structures, we are forever surrounded with evidence of mans greed and disregard for planet earth and its resources. I ponder over these pictures and wonder where the balance lies. We appear to have become so used to our impact on the planet that we have become blind to it.
Is there a message here? How can I hold up man’s waist in a way that makes the viewer see it differently? Can I encourage man to stop and think, if only for just one moment?
The answer may be in reversing the composition by showing the decaying rubbish as art that also captures nature in it. To express the contrast and emphasize the planet’s deterioration and decay. To achieve this, the message needs to be seen in isolation, to be removed from the urban and reflected back at us. To see it where we don’t expect to see it, in the hope that this will open our eyes and we will see it differently.
The Target Audience:
The audience is everyone in general and in particular those who can be influenced to change their consumerism habits and tread a little lighter on our planet.
The kind of organisations who may be interested in promoting this kind of message would be:

http://www.footprintnetwork.org/
This organisation monitors the impact we have on the planet and aims to promote living well whilst considering the impact on nature.
These two articles alone highlight the issues we face:
http://dreamofanation.org/img/Global-Footprint-Network.pdf
http://dreamofanation.org/img/Jerry-Linenger.pdf
Making of the artwork.
The making of this is design piece is an unknown quantity and will involve new learning, research, trials and problem solving. There are a number of considerations to this artwork.
One consideration is to look as this as a sculpture made from solid cast iron and allowed to rust. This would reveal considered straight edges and sharp points.

The sculpture would have a presence and a sense of weight and be a demonstration of modern engineering. We do not have the facilities to cast iron on the campus and to do this would mean commissioning out to a casting foundry. Although this is my most preferred option, there are issues to consider. This incurs a large cost and I would be left with an object of such weight, I would struggle to know what to do with it. Every time I wished to move the sculpture, there would be implications. Along with this there is a concern that the artwork becomes a sculpture where the message isn’t as clear.
My chosen option is to create an artwork that looks like rusted corrugated iron sheet that was once protected by a galvanised coating. The corrugate captures the shape of a pond ripple and the patina of the rusted metal will show an echo of a fish, as if it were swimming below the surface. The rusted and decaying nature represents the damage and decay of the planet caused by man. This is a reversing of what is caught in the photographs where nature is surrounded by man’s industrial waste; the artwork shows nature captured by the decaying industrial waste.
A mock-up of the design:

For this type of artwork, the medium is the message.
The corrugate sheet hangs from a concrete wall using rusted metal chain and industrial hooks. These elements support the industrial look.
One option is to fabricate this using sheet metal. Again we do not have the facilities or the required skills.
For me, the most plausible option is to fake it. Although not ideal, this option is the one I feel most comfortable with. I feel I would have most control over the finished look. However the risk comes from how convincing this will look.
I have photographed and collected rusted corrugate sheeting for reference.

How I intend to fake it….
The rusted metal finish:
First I explore the possibility of faking a rusted metal finish. Watching many YouTube videos :
Paint effect:
Using paint effects can give an illusion of rust with some methods or attempts looking better than others. It is difficult to get a real idea of how convincing these are but I feel they would not pass on close inspection and would be dismissed by the viewer.

www.youtube.com/watch?v=a-Et19MNKkY

www.youtube.com/watch?v=GyWtvjp8uNQ

www.youtube.com/watch?v=p5-AZyIojsY

www.youtube.com/watch?v=dlvHEcIkXxI&t=2s
Speeding up the rusting process.
I also looked at how to speed up the rusting process using various solutions, as demonstrated by many car enthusiasts to achieve a desired look. A typically concoction would consist of peroxide, vinegar and salt. The oxydisation takes a matter of hours and appears before your very eyes.

www.youtube.com/watch?v=OSH8CuSVN6M&t=56s

www.youtube.com/watch?v=dRnjQ_-1Zbc
Some of the videos demonstrate how masking is used to create graphics on the metal surface.

www.youtube.com/watch?v=RjAPyFQGYp4
Rusted iron paint
The most obvious and convincing solution is the rusting of an iron paint. This is paint that contains iron and uses a rusting agent to create real rust.

www.youtube.com/watch?v=VvoFNAHVR9A
I have investigated and followed this up. More information can be found at:
http://customcreationpaints.co.uk/rust-effect-paint
The kit is available on EBAY and contain everything that is needed, including primer and sealer:

This is quite a discovery and opens up a world of uses. I confess I am in my own little creative heaven.

Making the form:
Knowing that I am able to create a real rusted finish the next consideration is what media to use to create the form. The most obvious solution is fibreglass sheets and resin. Woven glass fibre sheets set in resin can produce strong forms of any shape. Often used for car body repair and building boats and windsurfs, fibreglass is a very versatile material. Fibreglass also benefits from being light whilst very strong. I have never used fibreglass but look forward to familiarising myself with the process.

Fibreglass kits are availble on Ebay.

Making the mould:
To create the form in fibreglass I need a mould of the form. Options for creating this are from:
- Clay
- gypsum plaster, as used in plaster casts.
- carved high density extruded foam
- Carved wood
- cement and sand

www.youtube.com/watch?v=HNmJr7cQlkQ
Cement and sand is a cheap and easily available option. The above video shows how a reality dry mix can be worked to cast in place a counter worktop. Throughout this demonstration it shows how the surface can be worked, repaired and made smooth. It occurs to me by taking a lead from this demonstration and by using a wooden former of jig, I can create the pond ripple in sand and cement in much the same way as building a sand castle.


The process:
Making the concrete mould:
Having thoroughly researched the process and acquired all the material, I am ready to embark on making the mould. I rescue a sheet of marine ply from a skip to use as a base to work on. Working in my garden, I mark out the size of the ripple and create a former. The former is made from 3 mm plywood, clamped and supported on both sides by glued and screwed wood to give the blade edge additional rigidity and strength. An 8mm stud rod is used as the centre pivot.


The board is covered with black plastic sheeting. This is pinned to the board and weighted down using bricks and concrete slabs. The sheet allows a work area larger than the board itself. Masking tape is used to mark out the desired area and galvanised steel mesh is fixed to the board to help give the concrete some re-enforced strength. The mesh, along with the staggered gap, is a considered extra as to allow me to use the broken up concrete mould as part of the final degree exhibit, if desired.


By rotating the former, the initial and very rough cast is made from a relatively dry (damp, not runny) mix of cement and sharp sand. This is a bit like building a concrete sand castle. A wet concrete mix (slip) is painted on top to help give the form a frim crust.


A finer mix of fine sand and cement is used to smooth out the form.
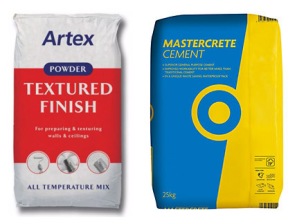
Before this sets completely, a mixture of Artex and cement, mixed to a consistency of clay, is applied as a top
coat. This mixture allows me to fill in any dents. It also allows me to add and work on the smaller, finer inner ripples and gives a workable fine finish to the concrete mould. A few coats of this finer mix are applied so I can achieve a ripple I am satisfied with.
Smoothing out the surface is achieved by periodically spaying with water and smoothing the surface with a damp sponge as the mixture sets. The concrete is then left to cure for a few days.


Once the concrete is set, fine ‘Wet & Dry’ sanding paper is used to smooth the surface further. The finished surface is as good as I could have hoped for. Although not a perfect finish, any imperfections will hopefully contribute to the texture of the rusted effect.
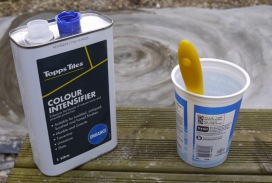
Some spare, left over concrete sealant is then applied to seal the mould and prevent the surface from being porous. This makes the surface water resistant and will help prevent the fibreglass adhering to the concrete.


Preparing the releasing agent and fibre-glassing over the mould.
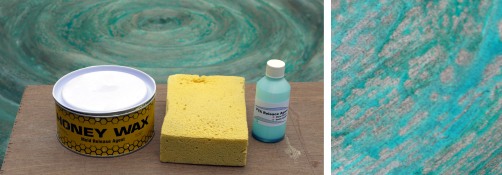
To prevent the fibreglass from sticking to the concrete mould, two releasing agents are used. Several thin coats of wax releasing agent are applied with a sponge, allowing the wax time to set between coats.
PVA release agent is then applied on top. This provides a thin blue, peelable, water soluble film between the mould and fibreglass.
Both release agents can be used independently or together. I chose to use both to be on the safe side, however I discovered that the PVA agent, being water based runs and pools. Strangely this may add to the rusted texture look.
Once the PVA has set, the blue tinted mould is ready for fibre-glassing.


Utilising the fibreglass kit containing resin, hardener and fibreglass matting bought off EBAY.
Tools used:a good supply of used large yogurt pots for mixing in, mixing sticks, paintbrushes and latex gloves.
Working quickly, pots of 250mL resin mixed with 1.5 % harder are used to coat the mould and press in and soak the fibreglass matting. 250 mL is about the maximum amount of resin I could mix and apply before the resin begins to go off, which happens surprisingly quickly. Working continuously for over 4 hours, two coats of resin and matting are applied over the mould.

Releasing the form from the mould
Once the fibreglass has cured, using a flat bladed knife, gentle upward pressure is applied to the corners and the edges. As the edges lift, using a hose, water is forced between the mould and the fibreglass. The form slowly lifts and separates away.

The rough edges are trimmed away and the face washed down with warm soapy water. Thorough research and process planning has paid off. So far the process has gone exceptionally smoothly and according to plan.
The smooth face and ripple form are as good as I could have hoped for. Being such an unknown and untested process, it is a joy and a relief to get to this part of the project successfully.

Supporting the artwork
To support the artwork I am using two 20mm Galvanised Steel Conduit Hooks. These are used in industrial environment to hang lighting from conduit pipe, used to house and protect electrical cables.

The threats are cut off and the hooks are welded to coach bolts so they can been screwed into a wall:

To complete the look, a rusted chain has been retrieved from the garden and is used to hang the artwork.

The fibreglass form is trimmed down to the final size. Two holes for hanging the artwork are drilled at the top. Conduit pipe fitting are placed in the holes for added strength and industrial visual effect. As per instructions with the rusting kit, the fibreglass is primed and painted with the metal paint.

Rusting solution is sprayed over this surface and time is allowed for the rust to appear. The result is quite effective and convincing. Strangely I struggle to suspend my belief as I am very aware of what this is artwork is made of.

For the degree show:
The medium is the message

There are three main components for the degree display:
- 80 cm x 130 cm faux rusted steel corrugated sheet made from fibreglass. This is hung via a rusted steel chain from hooks on a concreted wall.
- 3 x A4 sized photographs, mounted on board and adhered to wall.
- On the floor in front of the display will be a considered collection of discarded rubble, rusted corrugate and a bicycle wheel. This reflects the content of the photos and enhances the message.
To complement and place the artwork in an environment I intend to skim the wall with concrete and place some artefacts on the floor in front of the display. Looking back at the original inspiration for these elements, it occurs to me to make these artefacts appear as if they were discarded rubbish in water.
I collect rusted corrugate, bicycle wheel, wood, traffic cone and washing machine. These are cut so as to appear as if they were protruding out of water.

I would like the floor in front of the display look like water or wet to support this idea visually. One consideration was to create a shallow tanked trough of water. Talking to other people about this concept, the reflection of rippled light was mentioned and I had an inspired thought. Some aqua blue paint was rolled onto a piece of paper and I used a head gun to distort and ripple a clear A3 acetate sheet. The light reflection of the rippled acetate was quite appealing and changed as you moved around.

In addition to this I found a very cheap but effective LED lamp that projects a moving water ripple effect. It is surprisingly good and adds light and movement to the display.

Using this lamp means I now need to consider controlling the ambient light of the environment, the housing of the lamp and power.
The installation:
The installation requires some planning. Because I do not know the location of the installation and I wish to skim the wall with concrete, I will need MDF boarding to protect the wall. I may also need a free standing display. To explain this I sketch out my idea.


Recent Comments